Showing posts with label installation. Show all posts

How to use waste ceramics for flooring

Hw t use waste ceramics fr flooring
Using waste ceramics has its own technique


Using waste ceramics need to adjust the gap and grout according to the size of ceramics such as the installation of mosaic tiles with the outline of the pattern that has been drawn before.
The use of waste ceramics is one of the use of useful materials and environmentally friendly. It's just that your creativity is needed to use it

When wearing ceramic on the floor or wall is reasonable there are some broken ceramics. In general, the broken ceramics are thrown away because they are considered to be no longer used. If you are creative then the ceramics that have been broken can still be used and not inferior to the ceramic is still intact.

If you need a ceramic rupture you can get another place that wants to throw it so that the ceramics that have been considered cannot be used can be reused so that you are already using used goods and also save costs.

It's just using the former ceramics have a different technique that is different from installing ordinary ceramics. If you have ever installed a mosaic ceramic then the technique used is almost the same. This is because the mosaic ceramics generally wear special ceramics with certain motifs according to pattern patterns made by ceramic manufacturers.

It's just using the former ceramics have a different technique that is different from installing ordinary ceramics. If you have ever installed a mosaic ceramic then the technique used is almost the same. This is because the mosaic ceramics generally wear special ceramics with certain motifs according to pattern patterns made by ceramic manufacturers.


Different from using used ceramic then you have to be creative with your own pattern, with used ceramic material that you have. How can you draw first the pattern that you will plug with the former ceramics.

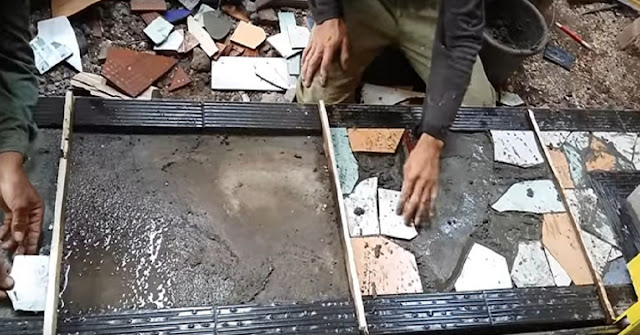
If you have finished with the pattern you created then put on the floor or wall that you will install the ceramic. Next you make the cement and sand dough. Preferably use cement drying is not too fast. This is due to the installation of old ceramics is longer than the whole ceramic. Moreover, the size of the former ceramics is smaller.

In order for the installation of ceramics in accordance with the patterns that have been made then laying the dough of cement and sand should follow the grooves and patterns that have been in the image. This work can become more complicated if many make irregular lines or arches. For that your patience is needed.

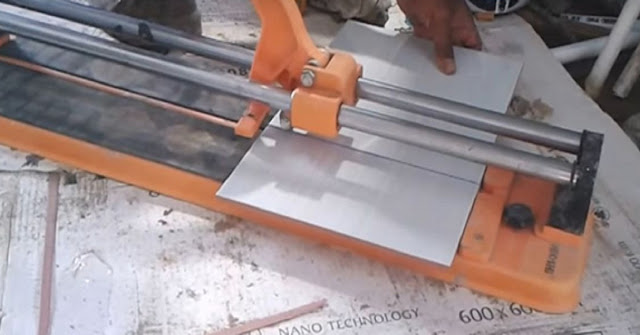
The main difficulty is the installation of the ceramics itself. The difficulty will be more than installing mosaic ceramics because the mosaic tile size is always the same and you have a clear picture in its installation. Differences with the installation of used ceramics because of different sizes differently even if necessary you also have to cut to adjust the pattern you have made it. Installation should also not leave a gap or grout that is too wide or large.

If incorrect installation will result in imperfect display of the floor or wall. If grout is too wide it will make the floor surface uneven and the grout will drop down if the floor is dry.

The same thing will happen on the margins of the pattern. Its regulatory system should also be appropriate. The pattern formed should be clearly visible. To reinforce the formed pattern can use a contrasting ceramic color. The color can be dark brown and light blue so the pattern is formed clearly visible.

So obviously to use used ceramics a bit complicated. If you are patient to do it not only save money by using used ceramics but your floor display will be interesting and unique.

Install small bathroom tile floor

Installing small bathroom tiles
Installing small-sized bathroom tiles require a separate way


Installing small-sized bathroom ceramics should be noted for water drainage with suitable hole shapes and of course also ceramic floor motifs and colors.
Unlike the size of a large bathroom, you can easily adjust the tile floor and also the necessary furniture for the bathroom. For a small bathroom you should use the room as efficiently as possible and also adjust the position of the tile floor.

Currently ceramics have become an important part of interest to cover the floor not only the living room of the family or the bedroom but other space including outdoor or exterior space such as the terrace and also the bathroom floor was also covered with many ceramics because the price is cheap and durable this type of flooring has some advantages compared to others.

But different if you install the ceramic in the bathroom because it takes its own techniques that in general if make a bathroom let alone only small sized course where due to space limitations. Therefore, for the bathroom looks more spacious should the ceramic is mounted with a diagonal position or tilt. But if the house has a wider size would not be a problem if installed in a row as usual.

The important thing is between the floor is on the side of the edge with the other side of the floor position should be higher and the position of the hole should be lower the width beyond the size of the bathroom whose purpose is that water dirt used for the bathroom can flow smoothly and can quickly enter the drain hole. If it does not flow smoothly then the fungus grows easily in that place.

If possible the hole or make the water is installed on the edge and the position of the lower floor so that its presence does not interfere with the beauty of perfection of the floor and space view In addition, if set in the corner of the floor installation so much easier to do because it relates to the height as described above.


When making a water discharge hole, the box is selected to ease the tile cutting work installed on the floor so that it is easy to use a tile cutting machine. But if the room with a round shape of tile pieces should be done manually and if not careful cuts become less tidy and not good.

to measure the tilt always kept awake after finished one row of tile did check once again the same thing must also be done if the bathroom is equipped with tub or place to hold water. Small holes needed to dispose of water while being cleaned are also installed at the bottom so that no errors occur you can use the helper line.

Medium for the floor surface is used anti-slip tile for safety factors that people do not easily slip because the floor is often exposed to water splashes so the floor is always wet and slippery. While the bathroom look better look better when choosing two types of tile motifs and its surface design should be the same

One more thing that should not be forgotten is when the bathroom is equipped with a shower or water tap should be mounted on the ceramic wall then the channel must be installed first. If the ceramic installation is finished then the next is to install on its tip and before the floor in a dry condition because do not directly use the bath tub also cannot be directly given water can lead to leakage.

How to fix a bulging ceramic floor

How to bulging ceramic floor
How to fix uplifted or bulging ceramics


Here's how to fix a bulging ceramic that can cause cracked or broken ceramics and the importance of distance and rubber or polymer.
Perhaps you have also experienced floor tiles that are bulging or cracked and broken. The tile floor is no longer beautiful and the ceramic looks prominent so that it is dangerous for the person who passes by.

Raised ceramics is a problem that often arise on the floor that uses ceramic material and then released if not immediately repaired of course be a danger because it can make people who pass it falling down. It often happens before it could be separated from the ceramic arrangement has been broken and the fractional forms also cause its own problems if not quickly handled.

Another problem that arises is becoming increasingly uncomfortable was when it had to be replaced, it kind of ceramic that is sought is not there or run out so must wear a type of ceramic else it makes the display floor become mismatched and the value of its beauty to be reduced even disappear altogether this condition which makes residents feel less comfortable. Because the eyes of the owner of the house is always fixed on the spot evens without realizing it is a psychological influence

Cases such as the ceramics were lifted above there are various causes for example there are compilers of cells in the dough cement and sand or mortar this is happening because of evaporation of water too fast when mounted ceramic cavity as a result emerged that make ceramics easily lifted and separated when it is dry.

Another thing that can happens is the vibrations that occur on the surface of the ground can also make ceramics easily raised this event is more common in buildings or building houses located on the edge of the highway is often traversed by large vehicles or near the factory using a production machine with the size which causes a very high vibration in the surrounding soil.

Similarly, changes in temperature that can makes mortar cement not able to adjust quickly if too hot can makes expansion but if it is very cold can experience shrinkage this often occurs in open spaces that often hit the sun directly, especially at noon or in almost daily use of refrigerators or air conditioners with very low temperature temperatures.


The occurrence of an earthquake that makes the position of the land to be shifted or according to the construction and building changes also can be a major cause of ceramics that rise to the above types of construction changes such as cracked concrete and the position or structure decreased significantly

Then how and best to avoid and repair raised ceramics? There are several methods that can be done first when mounted should be spaced between the walls or about two mm to have space left for ceramics if of shrinkage and expansion.

The second way can be to use a pad of foam or polymer mounted in the gap between the wall and the ceramic foam and can be a sustaining tool when the floor condition is enlarged due to expansion.

Another way is to make a good quality mortar between sand and cement should be mixed evenly and the oil is even better if using a mortar that claims as to install the tile floor because it contains materials that can raise the level of adhesion power.

If the ceramic has been lifted but not released yet better removed alone and then re-installed it is better if the ceramic already removed because it can be broken and cannot be used again but when it is released and broken with new replaced.

Then the technique to repair and reinstall the sand cement dough at the bottom should be dug or lifted and then made a new deeper dough. After that the ceramic is installed with the same process when first installing the ceramic.

Removing ceramic tile

Removing ceramic tile
Removing the tile floor can be done easily in the right way


Removing ceramic at floors can be done easily first by removing ceramic grout with cement remover and is a chemical to remove ceramic grout

Ceramic flooring has been very popular used ranging from simple homes to luxury homes and modern. The use of ceramics caused by strong and durable and easy in the installation and maintenance and motifs and colors are very diverse so easy in decorating the room in accordance with the wishes of homeowners.

But there is a time when the ceramic must be replaced with various causes because it is broken or broken, dull so it needs to be replaced in part or even all the existing ceramics in the room.

If the tile floor wants to replace the whole way the easiest way is to stack up new ceramics with old ceramics without the need to dismantle the old ceramics. But if you want to remove the old ceramic it takes a long time and also troublesome.

To remove the ceramics is done by opening the gap or grout it first. The goal is to obtain a space that will makes it easier to remove the ceramic and also the cement attachment that is on the bottom. Thus the existing ceramic beside it will not be damaged and can be used especially if you change only a few because damaged or broken.

This release can be done by carving techniques using small tool chisels and beaten slowly by using a wooden hammer.
Another way is to use a hand grinding machine which is usually also used for ceramic cutting.

If you use a grinding then you have to be careful because the grinding can also affect the existing ceramic beside it causes scratches. Use a grinder faster than you use a chisel.

Nowadays to release the grout there are chemicals or additives to ease the work. This material is a cement remover or a substance that destroys cement. The trick is quite easy by applying the substance to the grout and wait awhile then the cement will be soft so it is easier to carved or in grinding


To remove the ceramic to separate from the layers brought you just use a scrub that stirs the cement. Choose a wide but thin but strong shape.

Insert the scrub on the ceramic part slowly and the layer of cement. The scrub head tips are hammered with wood with care. If the scrub is getting deeper then ceramic will be released by itself. Because the cement and ceramics are firmly attached then the hammer from the wood must be hammered many times.

To facilitate the work should be tiled first floor watered with water. Do the work one by one until all the ceramics you want to remove. If removing ceramics should start from the edge on the wall and especially on the door because the process will be easier if you want to dismantle all the ceramics in the room.

If all the desired ceramics have been released all the next is to clean up the remaining cement layer before using the new cement and also if you want to use a new ceramic. To clean the old cement can be used with a concrete chisel with a larger size hammer for the old cement is destroyed directly.

After the old cement has been removed then the floor is compacted and leveled again. If there is a layer of sand that has been wasted then it must be replaced with a new one. Actually not all the sand on the bottom layer will be lost but that only adhere to the cement and ceramics. If all the work has been done then the installation of new ceramics can be done immediately.

Make a hole in the ceramic wall

Make a hole with perforating in the ceramic must use the appropriate bore so that the ceramic is not cracked or damaged at maximum speed to make the hole perfectly created.
There are times when we make on a ceramic wall for a particular purpose, while not all walls are covered with a layer of cement or sand dough. There are some parts of the wall using ceramics as a wall and most often encountered is the bathroom wall.

The use of ceramics on the wall has its own beauty compared to if it is covered with cement and also more resistant to water like the bathroom and also in the kitchen so there are times when need to be made holes for various purposes. To make a hole in the ceramic is not as easy as making on the cement wall especially wood walls because ceramics are very hard and make the hole into its own problem.

Because making a hole in the ceramic is somewhat different from the wall made of cement then needed a special way for it to create a hole and do not damage the ceramic.

Making a hole in the ceramic wall
Making a hole in the ceramic wall has a special way so that the ceramic is not damaged or broken


 The tool commonly used to make a hole in the ceramic wall is a drill machine. Never use nails, because the ceramic is so hard that it is difficult to penetrate the ceramic. As a result the ceramic wall can be damaged so that your ceramic wall is not good to the eye.

To perform a hole in the wall of the ceramic first position the correct hole you want and marked as using a marker.
Then cover the wall that you will hide with something media so that the drill is not slippery so easy when you drill the wall. Even better if you make a special disc to make a drill hole.

The drill bit you prepare is a special one that can penetrates hard objects like a diamond drill bit.
To facilitate drilling of the drill bit should be dipped first into the water. Then drilling can be done for about ten seconds. The goal is that the drill bit is not easy to heat. If needed dip it again into the water.

Drilling should also be done repeatedly because the ceramics are very hard and cannot be done only once with drilling.
The first drilling is only done to make the drill point only. Drilling also cannot be done in a hurry because it can cause cracks in ceramics or rupture. Nevertheless, the rotation on the drilling machine shall be at the maximum or highest rotation.


The pit point that has formed can be moistened with water. The goal is the same as the drill to reduce the heat on the ceramic. If too hot then drill bit will quickly wear out so quickly become blunt and easily broken. In the wet conditions ceramic will be more easily drilled. Besides ceramic dust is also not flying when the drill so it is not sucked in the nose or hit the eyes. However it is best to drill you should use a mask or glasses and gloves.

When you drill a note the drill bit should be perpendicular to the drilled ceramic, do not tilt and press as hard as possible using the hand unless the desired hole is tilted. Keep the drill does not experience a shift for it to be strongly pressed. Otherwise the drill bit will come out and this is very dangerous.

If the hole has been made and penetrates the ceramic it should remove the drill bit and be replaced with a smaller drill bit. This is because after penetrating the ceramic will meets with cement and bricks. If you keep using the same drill bit, it is likely that the holes in the cement wall or brick will have a larger diameter than the hole in the ceramic. So that the hole cannot be used.

How to cut a ceramic tile

Cutting ceramic tiles in a simple way and also in bulk size cuts must be precision and do not forget to wear safety devices.
Under certain conditions ceramic floor cannot be installed in size that existing ceramics sold in the market. This is related to conditions on the floor or walls, especially on the edge of the room or on the wall. For that need to adjust the size so that the ceramic must be cut first.

The technique of cutting ceramic tiles can be done in various ways ranging from a simple way such as using a ceramic ruler is Tile Scrabble. To apply this system can be done by first marking the tiles to be cut by drawing with an iron pencil that has been available, the goal to be made completely in accordance with the desired size

Before cutting check the ruler's eye are still sharp or not so the handle must be strong. The ruler's eye should be sharp to leave a deep mark so that the cutting time is completely straight and the size of the size corresponds to the size of the room itself especially on the edges of the wall that the ceramic pieces must be absolutely precise. The handle on the ruler must be strong to avoid irregularities during cutting.

How to cut a ceramic tile
How to cut a ceramic tile should be precision for the required size


The next step is to place a ruler on the surface of the ceramic tile and check whether the ruler is in the exact position where the line has been made before. Position your body as good as possible so that in the process of drawing the line can be done better.

The cutting tool is then placed on the ruler's eye and then pulled as firmly as possible along the line we want to cut, while doing this task keep the blade stick fixed on the ruler so that the ruler is pressed in a fixed position and will not experience a shift.

This is how to cut ceramics in the simplest way. In addition it is usually done for small things especially if you want to replace only a few tile or in the renovation process and do not require a lot of tiles to be installed and should be cut.

If the number of tiles to be cut should use the second way of tile gaiter ceramic cut tools. Actually the step used is also the same as making the first line where in tilegater it may have been equipped with a table to put the ceramic so that it is easily given a line and has been equipped with an iron ruler after that easily ceramic cut and this can cut the number of large tiles

While other simple ways that can be applied to cut the ceramic is to use a special grinding wheel or a round shape.
Cutting using the grille is more practical and fast, but has a greater risk if not done with care because the cut is not straight. This is because there is no handle or barrier that holds the blade. In addition the resulting vibration makes cuts not precise.


During the ceramic tile cutting to wear safety tools, such as masks, gloves and glasses.

Nowadays for ceramic cutters sold in the market many kinds. Simple tool up to the most sophisticated and determined by price variations.
The sale of ceramic cutting tools can be purchased directly in building stores and can also be purchased online.

Simple ceramic cutting tools you may need to replace the ceramics on the edge of the wall. If cutting ceramics in large quantities may already require a special ceramic cut tool that can cut ceramics in large quantities and is usually owned by property developers.